Nimble Streamer can be deployed and manipulated in various ways for various platforms. First of all you can install it from scratch on Linux, Windows or Mac on x64 or ARM. Being installed, Nimble can be controlled via WMSPanel. It provides convenience of control and reporting. Multiple server instances may be controlled via single web UI.
You can also run Nimble without registering WMSPanel, in this case you need to fix rules.conf file (e.g. /etc/nimble/rules.conf under Linux) to set streaming scenarios. This is especially useful when you automate your deployment.
However, our customers prefer registering their Nimble instances to WMSPanel even after manual setup. The problem is their settings will be replaced with default settings upon registration as it would be a new server in terms of the panel.
Previously we introduced the way to apply existing server settings via command line. Nimble takes rules.conf and applies the lines that are valid. If some entries are not valid, they will be automatically ignored.
Now we also introduce the web UI for rules.conf import and analysis. It allows specifying the config via dialog and see what is right or wrong about.
Please back up your rules.conf before using this method to avoid accidental damages.Go to "Servers" menu then click on Add server to open servers additional buttons.
There you can see "Restore Nimble Streamer from config" button. Click on it to open the following "Restore from config" dialog. Here you can insert the routes from rules.conf.
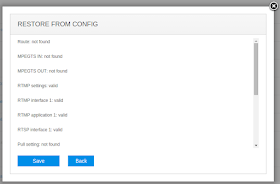
Now click on "Check config" button. The result will appear in the same dialog as shown below.
If anything is wrong, the corresponding line will be highlighted with red.
Now you can click on "Save". This will add new server in WMSPanel and all you need now is to register your server in WMSPanel in a special way using restore command. It will appear after you click Save as shown below.
You need to copy the appeared command. After closing the dialog you will see a new server in the list being marked as "offline".
Now go back to your server command line and run the command which you got in the dialog:
Please also check other server restore features.
Let us know if you have question on this or other features.
Nimble Streamer, Embedding Nimble Streamer, Repair configs after HW failures, Deploy ment automation
 |
| Config restore dialog. |
 |
| Analysed config. |
Now you can click on "Save". This will add new server in WMSPanel and all you need now is to register your server in WMSPanel in a special way using restore command. It will appear after you click Save as shown below.
 |
| Final command to re-register the server. |
You need to copy the appeared command. After closing the dialog you will see a new server in the list being marked as "offline".
Now go back to your server command line and run the command which you got in the dialog:
sudo /usr/bin/nimble_regutil --recovery-id bbc6b68c-58be-47c7-96c5-123456789
Then restart Nimble
sudo service nimble start
That's it, Nimble will appear in the list of servers as "online".
Please also check other server restore features.
- Repair configs after HW failures - this one works great if you change HW on your existing server or restore it after HW failure.
- Deployment automation - this on is good for the cases wen you automate your infrastructure deployment. E.g. you clone virtual machine with Nimble installed, and need to register it in WMSPanel in order to get statistics and perform further setup manually for multiple servers.
Let us know if you have question on this or other features.
Related documentation
Nimble Streamer, Embedding Nimble Streamer, Repair configs after HW failures, Deploy ment automation
