
Nimble Streamer is a light-weight HTTP streaming media server. The "light-weight" means that it’s targeted for being used on small virtual servers. These small servers can be deployed both as a single server and as a task force, or a farm, which can effectively stream the media via HLS, Smooth and progressive download.
Nimble is provided free of charge and its target platform is Ubuntu. If you want to make further savings, you look for the cost-effective hosting provider. DigitalOcean has the unbeatable prices which makes it a great virtual cloud provider for streaming media hosting. Of course you can use any other hosting provider like Amazon or Rackspace. WMSPanel is not affiliated with neither of the mentioned companies.
Let's see how "DigitalOcean + Nimble Streamer" stack can help you start streaming VOD content within just several minutes. We’ll follow these easy steps:
1.1 Go to your DigitalOcean account and and click on "Create droplet".
 1.2 Let's call it nimble-streamer and set its RAM size to 512MB.


2.1 Nimble is controlled via WMSPanel cloud control panel and via config files. WMSPanel is the primary way to manage Nimble instances. To start using it you need to sign up first.
 2.2 Check the email you've used during installation. You'll get a login and a password there. Go to Log in page and enter your credentials.
 Those credentials will be used further for installing the server.
2.3 Now get back to the terminal window. We need to say our Ubuntu where it will install Nimble from. Let’s add a repository:

2.5 Once the package is installed, we need to map your Nimble Streamer instance to WMSPanel in order to control it efficiently and browse statistics reporting. Run this command:
 2.6 The server has been added into control panel, you'll just need to restart it:
 Go back to WMSPanel and check Servers page.
 Nimble Streamer is marked as "Running".
This means it's ready to stream.
Nimble is provided free of charge and its target platform is Ubuntu. If you want to make further savings, you look for the cost-effective hosting provider. DigitalOcean has the unbeatable prices which makes it a great virtual cloud provider for streaming media hosting. Of course you can use any other hosting provider like Amazon or Rackspace. WMSPanel is not affiliated with neither of the mentioned companies.
Let's see how "DigitalOcean + Nimble Streamer" stack can help you start streaming VOD content within just several minutes. We’ll follow these easy steps:
- Create virtual server in DigitalOcean.
- Install Nimble Streamer.
- Set up streaming routes.
- Test the VOD streaming on a desktop and on a mobile device using HTML5 player and JWPlayer.
1. Creating server in DigitalOcean
1.1 Go to your DigitalOcean account and and click on "Create droplet".


1.3 Let's have New York 2 region.

1.4 Select Ubuntu 12.04.3 x64 image.

1.5 Now click on Create droplet.

In about a minute you'll have your server up and running, your admin login and password will be sent to your email.
1.6 Now log in. In this example we got 162.243.93.111 IP address. Run the terminal and use the following command:
1.6 Now log in. In this example we got 162.243.93.111 IP address. Run the terminal and use the following command:
ssh root@162.243.93.111and then enter the password.

2. Install Nimble Streamer
2.1 Nimble is controlled via WMSPanel cloud control panel and via config files. WMSPanel is the primary way to manage Nimble instances. To start using it you need to sign up first.


2.3 Now get back to the terminal window. We need to say our Ubuntu where it will install Nimble from. Let’s add a repository:
echo "deb http://nimblestreamer.com/ubuntu precise/" >> /etc/apt/sources.list

2.4 Update repositories by running:
apt-get update
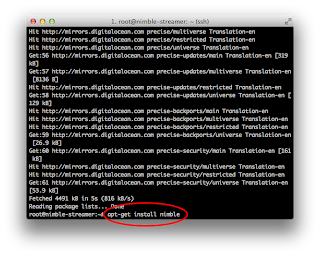
Now Ubuntu knows where to install Nimble Streamer from. Let’s just install it using the following command:
apt-get install nimble

The system will ask for confirmations several times during the installation process. Each time, just press "y" and then "Enter".
2.5 Once the package is installed, we need to map your Nimble Streamer instance to WMSPanel in order to control it efficiently and browse statistics reporting. Run this command:
/usr/bin/nimble_regutiland enter WMSPanel credentials from the email you've used for logging in.

service nimble restart


This means it's ready to stream.
3. Set up streaming routes
3.1 Let get some content for further streaming operations. Let’s upload some demo content and tell Nimble Streamer what we want to stream and how.
Create a directory for the video content and go there:

Once the download is complete, you’ll have BigBuckBunny_320x180.mp4 file in /var/www/video directory. This is the video we’ll be streaming for our example.
3.3 Go to WMSPanel to Control / Edit Nimble routes menu
 You'll see the routes set up page. Click on Add VOD streaming route.
 3.4 In the new dialog we need to specify where the viewers will request content via public URL (/vod/) and where this content will be taken from (/var/www/video/). As WMSPanel allows selecting more than one Nimble Streamer to apply the routes at the same time, you need to choose at least current nimble-streamer server and click OK.

3.5 The new route will appear in the list.

We can now test our new streaming solution.
4.1 According to the route, all video located in /var/www/video will be accessible via the following URL:
Run VLC media player and click on Open media.
 In the opened dialog choose Network tab and enter this URL:
 Now click Open and watch it playing via HTTP Live Streaming!
 You’re an HLS streamer now and your video can be watched on iPad, iPhone and any other device which supports this protocol.
4.2 Now let’s embed this video into some simple HTML page and try watching it in the desktop browser.
Create video.html file containing the following lines, it's pure HTML5.
These examples allow opening this page and view the video using any browser of any device.
Now open it.
 That’s it!
Now you have a streaming media server which streams MP4 video for desktop as well as for mobile devices.
Please also consider using Nimble Streamer for creating ABR VOD HLS using SMIL files. Speaking of ABR, Nimble is capable of transmuxing ABR live streaming, e.g. RTMP to ABR HLS and as well other protocols.
You can also take a look the video where Jan Ozer of Streaming Learning Center and Yury Udovichenko of Softvelum discuss pros and cons of dynamic packetizing of live, VOD and DVR content. It gives more details about Nimble Streamer VOD streaming.
Learn more about Nimble Streamer features and contact us if you want to make your own streaming infrastructure.
Nimble Streamer, Transmuxing RTMP to ABR HLS, MPEG-TS UDP to ABR HLS transmuxing with Nimble, MP4 transmuxing to HLS VOD streaming, Nimble Streamer hotlinking protection, Pay-per-view for Nimble Streamer
Create a directory for the video content and go there:
mkdir -p /var/www/video3.2 For this sample streaming we’ll use the favorite cartoon of all media streamers, the Big Buck Bunny. You can get the content via the terminal by running this command:
cd /var/www/video
wget http://download.blender.org/peach/bigbuckbunny_movies/BigBuckBunny_320x180.mp4


3.5 The new route will appear in the list.

We can now test our new streaming solution.
4. Test streaming media via multiple devices
4.1 According to the route, all video located in /var/www/video will be accessible via the following URL:
http://<server address>:8081/vod/The IP address for the new server is 162.243.93.111. The name is BigBuckBunny_320x180.mp4. Let’s play it.
Run VLC media player and click on Open media.

http://162.243.93.111:8081/vod/BigBuckBunny_320x180.mp4/playlist.m3u8


4.2 Now let’s embed this video into some simple HTML page and try watching it in the desktop browser.
Create video.html file containing the following lines, it's pure HTML5.
<!DOCTYPE html>Notice that we’ve included 2 URLs for our bunny video. For progressive download we used the same URL, we just removed /playlist.m3u8 in the end to get this:
<html>
<head>
</head>
<body>
<video controls="controls" preload="metadata" style="width: 100%;">
<source src="http://162.243.93.111:8081/vod/BigBuckBunny_320x180.mp4/playlist.m3u8" type="application/x-mpegurl">
<source src="http://162.243.93.111:8081/vod/BigBuckBunny_320x180.mp4" type="video/mp4">
</video>
</body>
</html>
<source type="video/mp4" src="http://162.243.93.111:8081/vod/BigBuckBunny_320x180.mp4">If you'd like rich end-user experience you may use some custom player. Let's see how this works for JWPlayer, one of the best players to show your media on a variety of devices. Use this HTML code to set it up.
<!DOCTYPE html>
<html>
<head>
<script type="text/javascript" src="http://codeorigin.jquery.com/jquery-1.10.2.min.js"></script>
<script type="text/javascript" src="http://player.longtailvideo.com/jwplayer.js"></script>
</head>
<body>
<div id='my-video'></div>
<script type='text/javascript'>
jwplayer("my-video").setup({
playlist: [{
sources: [{
file: "http://162.243.93.111:8081/vod/BigBuckBunny_320x180.mp4/playlist.m3u8"
},{
file: "http://162.243.93.111:8081/vod/BigBuckBunny_320x180.mp4"
}]
}],
height: 480,
width: 640,
autostart: 'true',
startparam: "start",
});
</script>
</body>
</html>
Now open it.

Now you have a streaming media server which streams MP4 video for desktop as well as for mobile devices.
Please also consider using Nimble Streamer for creating ABR VOD HLS using SMIL files. Speaking of ABR, Nimble is capable of transmuxing ABR live streaming, e.g. RTMP to ABR HLS and as well other protocols.
You can also take a look the video where Jan Ozer of Streaming Learning Center and Yury Udovichenko of Softvelum discuss pros and cons of dynamic packetizing of live, VOD and DVR content. It gives more details about Nimble Streamer VOD streaming.
Learn more about Nimble Streamer features and contact us if you want to make your own streaming infrastructure.
Related documentation
Nimble Streamer, Transmuxing RTMP to ABR HLS, MPEG-TS UDP to ABR HLS transmuxing with Nimble, MP4 transmuxing to HLS VOD streaming, Nimble Streamer hotlinking protection, Pay-per-view for Nimble Streamer