
Nimble Streamer provides integration with Zixi Broadcaster in order to create a bridge between the Zixi protocol and all the technologies that are supported by the Nimble Streamer live streaming feature stack. This article describes the technical details of Zixi-Nimble integration.
1. Prerequisites
The concept is to have Zixi Broadcaster be controlled by WMSPanel as a backbone for receiving the Zixi stream, while all further processing is performed by Nimble Streamer with its variety of features including live streaming protocols transmuxing and transcoding, Paywall, Reporting, DRM and others.
A dedicated server is required to concurrently operate Nimble Streamer and Zixi Broadcaster on the same hardware.
Both Windows and Linux platforms are supported. The setup is tested with Zixi Broadcaster v16 and the latest version of Nimble Streamer.
Both Zixi Broadcaster and Nimble Streamer need active licenses or subscriptions.
The installation process for Zixi Broadcaster is not covered in this article. Please refer to Zixi documentation or reach out to Zixi support about this.
As for Nimble, you can find all related technologies’ documentation on this page and beyond. If you have any questions or issues installing a Nimble instance, please contact our support team.
Notice that the Zixi Broadcaster will be used by Nimble exclusively, and any additional manual settings of Zixi Broadcaster will be deleted.
In order to allow Nimble to control Zixi Broadcaster, please specify Broadcaster’s admin user credentials in the nimble.conf file.
The location of the Nimble’s config for the Linux version:
A dedicated server is required to concurrently operate Nimble Streamer and Zixi Broadcaster on the same hardware.
Both Windows and Linux platforms are supported. The setup is tested with Zixi Broadcaster v16 and the latest version of Nimble Streamer.
Both Zixi Broadcaster and Nimble Streamer need active licenses or subscriptions.
The installation process for Zixi Broadcaster is not covered in this article. Please refer to Zixi documentation or reach out to Zixi support about this.
As for Nimble, you can find all related technologies’ documentation on this page and beyond. If you have any questions or issues installing a Nimble instance, please contact our support team.
Notice that the Zixi Broadcaster will be used by Nimble exclusively, and any additional manual settings of Zixi Broadcaster will be deleted.
2. Setting up Nimble Streamer config
The location of the Nimble’s config for the Linux version:
/etc/nimble/nimble.confThe location of the Nimble’s config for the Windows version:
C:\Program Files\Nimble Streamer\conf\nimble.conf
Do not forget to elevate the current user permissions for accessing the config files, like running the editor via sudo for Linux or ‘as Administrator’ for Windows.
Add the following lines to the end of the config file and substitute *actual_zixi_broadcaster_password* with a real one (without asterisks).
Add the following lines to the end of the config file and substitute *actual_zixi_broadcaster_password* with a real one (without asterisks).
### Zixi ###
zixi_port = 4444
zixi_username = admin
zixi_password = *actual_zixi_broadcaster_password*
Next, restart Nimble to apply the above changes e.g. via the command line for Linux or services snap-in for Windows.
If you succeed you will notice Zixi interfaces detected on the Server Info page in WMSPanel:

3. Receiving Zixi stream via Nimble
Navigate to 'Live Streams Settings' and go to the MPEGTS IN tab. Find and click the 'Add Zixi Stream' button. A dialogue will appear for specifying parameters to receive a Zixi stream. The Receive mode options include 'Listen' for pushing a stream to this server (e.g. by Larix Broadcaster for iOS) and 'Pull' for retrieving a stream from another location, such as another Zixi server or source.
3.1 Setup Listening for Zixi Stream
Choose Receive mode as Listen:

When Listen mode is selected, a notification that Nimble detects Zixi Broadcaster by the ‘Zixi input interfaces:
zixi://*:2088’ is displayed. If there’s no such line then it’s a sign that Nimble can’t reach the Broadcaster.
For unified management of any incoming MPEGTS streams, Alias, Description and Tags could be specified for additional identification. These handy labels help quickly find and group streams through WMSPanel. They are available for many other settings and we advise using them.
A Zixi stream must have a unique StreamID to be accepted. The StreamID is a string that identifies the stream. It is set in the respective field and must be the same as on the sender.
Next, the fields for Custom parameters and Values where optional parameters for the Zixi stream can be filled out.
These are used to specify additional options like latency, stream password, encryption type, etc.
We suggest referring to Zixi documentation for details, however, here's a description of options shown on a screenshot:
- password - Set stream password (blank by default)
- latency - Set latency in milliseconds: overrides remote latency configuration (this one is optional, by default the latency is defined on the sending device)
Click Save to initiate synchronization of the settings between Nimble Streamer, Zixi Broadcaster and WMSPanel.
Any manually created settings of Zixi Broadcaster will be erased and substituted by the parameters received from WMSPanel. The record for the Listening for Zixi stream settings will appear in the MPEGTS IN section. As the syncs are complete a green checkmark will confirm Nimble received and is ready to use this setting:

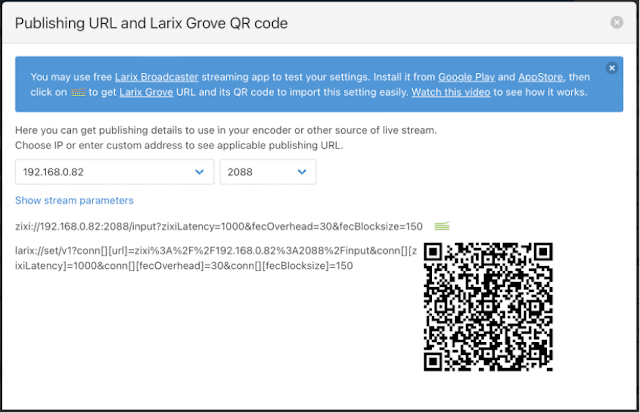
By the way, sharing Zixi’s publishing URLs is also supported by the Larix Grove format. To get a publishing URL or a QR code for it, click on a ‘?’ icon:
Set up the source for streaming and start pushing the stream from another Zixi-capable software like Larix Broadcaster to your Nimble instance.

4.2 Setup Pulling of a Zixi Stream
In order to confirm that the stream is received, navigate to the ‘Live Streams’ page. There’s a handy way to do it: click on a server name in a breadcrumb located between ‘Live streams /’ and ‘/ Live stream settings ‘ to switch to the Live Streams page instantly.
The received stream’s parameters are stored here. Click ‘?’ to get the output stream’s URL or play this stream with the embedded set of video players.

The ‘Source’ value is a StreamID of a Zixi stream defined on a remote machine.
The ‘StreamID’ field refers to the unique name which Nimble will use after receiving the Zixi stream locally.
All other configuration options are the same as for Listen mode as explained above.
Please refer to the previous section for respective details.
Click ‘Save’ to sync and apply settings to Nimble and Zixi Broadcaster. The settings record will appear with a Bandwidth, program count and a green check mark.
If MPEGTS OUT was defined, please navigate to Live Streams to check the received stream settings or watch it via video player.
Any stream that reaches Nimble by any supported protocol can be re-published as a Zixi stream to other destinations.
First, ensure the reception is defined on a remote Zixi Broadcaster server. Login to Zixi Broadcaster’s panel, Click ‘+New Input’ in the ‘INPUTS’ section, and type in the Stream ID which will be used to identify the stream coming from Nimble:

Use any other Zixi options as required.
Click ‘OK’ and switch to WMSPanel to set Nimble for sending Zixi stream.
Navigate to the ‘Live Streams Settings’-> ‘UDP Streaming’ tab and click ‘Add Zixi settings’.
If MPEGTS OUT was defined, please navigate to Live Streams to check the received stream settings or watch it via video player.
4. Publish a Zixi stream from Nimble to another Zixi Broadcaster instance
4.1 Push mode Zixi streaming

Use any other Zixi options as required.
Click ‘OK’ and switch to WMSPanel to set Nimble for sending Zixi stream.
Navigate to the ‘Live Streams Settings’-> ‘UDP Streaming’ tab and click ‘Add Zixi settings’.
The setup is similar to MPEGTS UDP Streaming, which you may be familiar with.

To Push a stream, fill in the Remote IP, Remote Port and Stream ID of a Zixi’s remote point. Note the same ‘Stream ID’ is used as defined on Zixi Broadcaster earlier.
Any additional Zixi parameters can be passed via the ‘Custom parameter’/’Custom value’ fields.
Specify a stream to send, by typing its application and name in the ‘Source application name’ and ‘Source stream name’ under the ‘Set source streams’ bullet. It’s allowed to specify several apps/streams here to form a multiple-program TS stream.
The ‘Raw MPEGTS source’ is also available to pass through some received sources intact, as described in the respective documentation page.


The ‘Listen’ mode assumes that Nimble will wait for a connection from a remote Zixi server, and as soon as it is established, it will serve stream data for pulling.
On a Zixi Broadcaster side, click ‘+New Input’ in the ‘INPUTS’ section, and select the ‘Pull’ radio button:
Click ‘Save’ to start pushing a Zixi stream from Nimble and find it on a remote Zixi Broadcaster server:

The StreamID here will be the RemoteID for Nimble. Use some unique name.
‘Host’ is a Nimble Streamer box, and ‘Port’ is the port used for output in Zixi’s integration. 2088 is the default.
‘Stream’ is the StreamID we will define on Nimble side a bit later. It’s used to link Nimble’s streams with the Zixi protocol under this ID. This is a stream that will be taken from Nimble by Zixi Broadcaster.
Use any other parameters here, but don’t forget to ‘mirror’ them on the Nimble side if it is required by the protocol. For instance, if you define encryption type and string on a source, don’t miss to set the decryption params on the receiver.
Click ‘OK’, and move on to WMSPanel to configure Nimble.
As before, navigate to the ‘Live Streams Settings’-> ‘UDP Streaming’ tab and click ‘Add Zixi settings’, but now choose ‘Listen’ mode.

The crucial difference with the Push mode is that you must specify a StreamID of Zixi’s remote Pull settings, which is named ‘Remote ID’ here.
Specify the ‘Source application name’ and ‘Source stream name’ of streams which are available on Nimble, and assumed for transfer.
Fill a local ‘StreamID’ that will unite the streams that are specified in the Source Application/Stream name fields to transfer to Zixi Broadcasters. Keep in mind, that on a Zixi Broadcaster’s side, this name must be specified in a ‘Stream’ field of a Pull settings.
All other options are similar to Push mode and already described in the Zixi Push section above, please refer to them.
Click ‘Save’, and WMSPanel will confirm the settings are accepted by a green checkmark:


If you have any questions or issues regarding this functionality, our support team is ready to help, ensuring a successful Zixi streaming with Nimble.

Any additional Zixi parameters can be passed via the ‘Custom parameter’/’Custom value’ fields.
Specify a stream to send, by typing its application and name in the ‘Source application name’ and ‘Source stream name’ under the ‘Set source streams’ bullet. It’s allowed to specify several apps/streams here to form a multiple-program TS stream.
The ‘Raw MPEGTS source’ is also available to pass through some received sources intact, as described in the respective documentation page.

On a Nimble side, the Push record appears in the MPEGTS IN tab:

4.2 Listen mode Zixi streaming
On a Zixi Broadcaster side, click ‘+New Input’ in the ‘INPUTS’ section, and select the ‘Pull’ radio button:
Click ‘Save’ to start pushing a Zixi stream from Nimble and find it on a remote Zixi Broadcaster server:

The StreamID here will be the RemoteID for Nimble. Use some unique name.
‘Host’ is a Nimble Streamer box, and ‘Port’ is the port used for output in Zixi’s integration. 2088 is the default.
‘Stream’ is the StreamID we will define on Nimble side a bit later. It’s used to link Nimble’s streams with the Zixi protocol under this ID. This is a stream that will be taken from Nimble by Zixi Broadcaster.
Use any other parameters here, but don’t forget to ‘mirror’ them on the Nimble side if it is required by the protocol. For instance, if you define encryption type and string on a source, don’t miss to set the decryption params on the receiver.
Click ‘OK’, and move on to WMSPanel to configure Nimble.
As before, navigate to the ‘Live Streams Settings’-> ‘UDP Streaming’ tab and click ‘Add Zixi settings’, but now choose ‘Listen’ mode.

The dialogue will highlight available Zixi’s interfaces.
The crucial difference with the Push mode is that you must specify a StreamID of Zixi’s remote Pull settings, which is named ‘Remote ID’ here.
Specify the ‘Source application name’ and ‘Source stream name’ of streams which are available on Nimble, and assumed for transfer.
Fill a local ‘StreamID’ that will unite the streams that are specified in the Source Application/Stream name fields to transfer to Zixi Broadcasters. Keep in mind, that on a Zixi Broadcaster’s side, this name must be specified in a ‘Stream’ field of a Pull settings.
All other options are similar to Push mode and already described in the Zixi Push section above, please refer to them.
Click ‘Save’, and WMSPanel will confirm the settings are accepted by a green checkmark:

Navigate to Zixi Broadcaster to confirm reception:

This article has taken you through the process of integrating Zixi streaming with Nimble Streamer. With the combined capabilities of Nimble and Zixi Broadcaster, you’ll get efficient and top-notch video content delivery.
If you have any questions or issues regarding this functionality, our support team is ready to help, ensuring a successful Zixi streaming with Nimble.