
Live Transcoder for Nimble Streamer provides wide feature set for transforming live content using both software libraries and hardware acceleration.
NVidia NVENC always fully supported in Live Transcoder for decoding and encoding but all filtering operations were performed using CPU. That caused extra resources usage to transfer processed frames among CPU, GPU and RAM.
Nimble Live Transcoder now allows building transcoding pipelines which are performed completely with NVidia GPU hardware acceleration. This is done using specific FFmpeg libraries which we use in addition to our own code.
We'll show you how to set up this NVENC-powered processing chain.
We assume you've already set up Nimble Streamer, it's been set up to get an incoming live stream and you've tested basic streaming. In our example we'll use a stream which application name is "input" and stream name is "source".
If you're not familiar with Live Transcoder, take a look at Transcoder documentation reference.
Notice that the described functionality is available on Ubuntu 18.04, 20.04 and 22.04 only. We'll support other upcoming LTS Ubuntu releases as well.
The basic steps to make NVENC working are as follows:
Now create a new scenario to start a new pipeline setup.
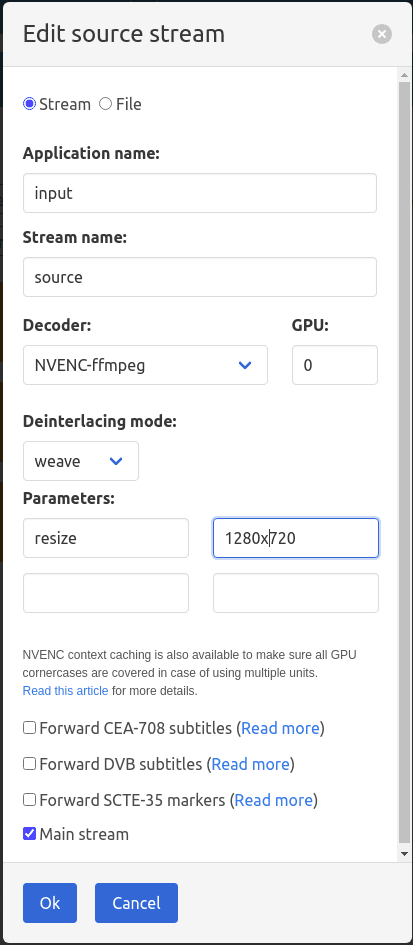
Once you create a new scenario, drag and drop a blue decoder element onto the dashboard. There you need to specify "NVENC-ffmpeg" in Decoder field.

Once the incoming stream is received, Nimble Transcoder will use proper NVDEC/CUVID FFmpeg decoder: h264_cuvid, hevc_cuvid or mpeg2_cuvid. Each decoder has its set of options in case you'd like to fine-tune them or if you want to use extended feature set.
The GPU core number from GPU field will be used in the pipeline which you create. So all further filters and encoders will recognize the source GPU core and will execute their transformations there.
One of those features for all decoders is the ability to resize the frame during decoding. This operation is highly optimized and you can use it to reduce further resource usage. This is available via "resize" parameter as shown on a picture below. Notice that the value is set as <width>x<height>.

This feature is specifically helpful when you have FullHD stream input and you need to downscale it further. This resolution requires a lot of resources to handle so if you make initial downscale to HD or even lower resolution, then all further operations will consume less RAM and processing power on GPU.
Notice that all forwarding features (subtitles and SCTE-35 markers forwarding) mentioned at the bottom of the dialog will work regardless of decoding option which you choose.
Now let's set up filtering.
Once the frame is decoded you can process it via a set of ffmpeg filters which are able to control NVENC behavior.
NVidia NVENC always fully supported in Live Transcoder for decoding and encoding but all filtering operations were performed using CPU. That caused extra resources usage to transfer processed frames among CPU, GPU and RAM.
Nimble Live Transcoder now allows building transcoding pipelines which are performed completely with NVidia GPU hardware acceleration. This is done using specific FFmpeg libraries which we use in addition to our own code.
We'll show you how to set up this NVENC-powered processing chain.
1. Installation and initial setup
We assume you've already set up Nimble Streamer, it's been set up to get an incoming live stream and you've tested basic streaming. In our example we'll use a stream which application name is "input" and stream name is "source".
If you're not familiar with Live Transcoder, take a look at Transcoder documentation reference.
Notice that the described functionality is available on Ubuntu 18.04, 20.04 and 22.04 only. We'll support other upcoming LTS Ubuntu releases as well.
The basic steps to make NVENC working are as follows:
- Install the latest NVidia drivers on your server.
- Create a transcoder license and subscribe for it.
- Install Live Transcoder add-on.
- Create some simple scenario with CPU transcoding (e.g. downscale your stream to 240p). This way you'll make sure the transcoder was set up properly.
sudo apt-get update
sudo apt-get install nimble-transcoder
Now create a new scenario to start a new pipeline setup.
2. Decoder setup
Once you create a new scenario, drag and drop a blue decoder element onto the dashboard. There you need to specify "NVENC-ffmpeg" in Decoder field.

Once the incoming stream is received, Nimble Transcoder will use proper NVDEC/CUVID FFmpeg decoder: h264_cuvid, hevc_cuvid or mpeg2_cuvid. Each decoder has its set of options in case you'd like to fine-tune them or if you want to use extended feature set.
The GPU core number from GPU field will be used in the pipeline which you create. So all further filters and encoders will recognize the source GPU core and will execute their transformations there.
One of those features for all decoders is the ability to resize the frame during decoding. This operation is highly optimized and you can use it to reduce further resource usage. This is available via "resize" parameter as shown on a picture below. Notice that the value is set as <width>x<height>.
This feature is specifically helpful when you have FullHD stream input and you need to downscale it further. This resolution requires a lot of resources to handle so if you make initial downscale to HD or even lower resolution, then all further operations will consume less RAM and processing power on GPU.
Notice that all forwarding features (subtitles and SCTE-35 markers forwarding) mentioned at the bottom of the dialog will work regardless of decoding option which you choose.
If you change decoder settings of a scenario which is active and running, then you need to re-start the scenario.
Now let's set up filtering.
3. Filtering
Once the frame is decoded you can process it via a set of ffmpeg filters which are able to control NVENC behavior.
Nimble Transcoder supports a number of those, here are the most frequently used.
"split" - allows creating several identical outputs from input video. It's available as a filter element in a tool box of Transcoder UI.
"scale_npp" performs frame scaling. You add a custom filter to your scenario, set its name to "scale_npp" and its value to resolution, e.g. "854:480" or "640:360".
Notice that scale_npp can have only one output.

"fps" is a filter which sets the frames per second value. It's also defined via custom filter.
Picture filter allows setting a static image overlay for a video. Once you add it into your scenario, choose "CUDA" in Encoding hardware dropdown.

Notice that regular Scale filter from the UI toolbox will not work with GPU-decoded frames as well as other regular ffmpeg filters just because the processing is done internally in GPU.
However, you can take the frame out of GPU and process it separately using "hwdownload" and "hwupload_cuda" filters. To add them, add a custom filter, set its name as mentioned and leave the value field empty. Your steps will be as follows:
Notice that it will increase RAM/CPU usage so use it only if you need to do something you cannot do on GPU.
Let us know if you need information about other filters.
Having the content transformed via filters, you can now encode it. Add encoder element to your scenario and select "FFmpeg" in "Encoder" field.
Then define "Codec" field as either h264_nvenc or hevc_nvenc - for H.264/AVC or H.265/HEVC codecs respectively.

You can use any parameters applicable for h264_nvenc or hevc_nvenc encoders.
For h264_nvenc most popular parameters would be these:
If your input stream is anamorphic you might need to save its SAR parameter in the output as well, especially if you’re using a 'scale' filter in your Transcoder pipeline while DAR = SAR x Width / Height. Nimble supports keeping input SAR using keep-sar parameter set to true for encoder in its ‘Video output’ section. SAR/DAR/PAR correlation is described in this article.
However, you can take the frame out of GPU and process it separately using "hwdownload" and "hwupload_cuda" filters. To add them, add a custom filter, set its name as mentioned and leave the value field empty. Your steps will be as follows:
- Add "hwdownload" to get the frame from GPU.
- Add "format" custom filter with "nv12" value to set proper frame format.
- After that you can use regular FFmpeg filters.
- Then add "hwupload_cuda" filter to put it back into GPU processing pipe.
Notice that it will increase RAM/CPU usage so use it only if you need to do something you cannot do on GPU.
Let us know if you need information about other filters.
4. Encoder setup
Having the content transformed via filters, you can now encode it. Add encoder element to your scenario and select "FFmpeg" in "Encoder" field.
Then define "Codec" field as either h264_nvenc or hevc_nvenc - for H.264/AVC or H.265/HEVC codecs respectively.

You can use any parameters applicable for h264_nvenc or hevc_nvenc encoders.
For h264_nvenc most popular parameters would be these:
- "b" defines bitrate in Mbps. Example: "4.5M" for 4.5 Mbps.
- "profile" defines encoding profile, its possible values are "baseline", "main", "high", "high444p".
- "preset" stands for encoding preset, its values are "default", "slow", "medium", "fast", "hp", "hq", "bd", "ll", "llhq", "llhp", "lossless", "losslesshp".
For more encoder settings, refer to FFmpeg documentation.
Just like you saw in decoder element, all forwarding features from listed under Expert setup at the bottom of the dialog will work properly.
When you have video pipeline set up, you need to define audio part. If you don't need any sound transformation, you can add a passthrough for it just like it's described in other setup examples.
We've made a video showing the example of setup process, take a look at it:
Here's what we set up there:
This scenario uses only NVENC capabilities for video processing. The output streams are then transmuxed into the output streaming protocols which you select in global server settings or specific settings for "live" application.
If you have any questions, issues or questions, please feel free to contact us.
5. Audio setup
When you have video pipeline set up, you need to define audio part. If you don't need any sound transformation, you can add a passthrough for it just like it's described in other setup examples.
6. Example
We've made a video showing the example of setup process, take a look at it:
Here's what we set up there:
- A decoder has a downscale to 720p as described in section 2 above.
- A split filter which has 3 equal outputs.
- One output goes directly to the encoder. It takes the downscaled frame and simply encodes it into live/stream_720 output. The encoding parameters are similar to what you see in section 4.
- Another output it processed via Scale_npp filter which scales it to 480p. That filter is described in section 3. Its output is encoded to live/stream_480 output stream.
- One more output of split filter goes through "Scale_npp" (to scale to 360p) to "Fps" filter which sets its "fps" value to "25". Then it's encoded into live/stream_360 output.
- Audio input is passed through for all 3 available output renditions.
This scenario uses only NVENC capabilities for video processing. The output streams are then transmuxed into the output streaming protocols which you select in global server settings or specific settings for "live" application.
If you have any questions, issues or questions, please feel free to contact us.
Related documentation
Live Transcoder for Nimble Streamer, Transcoder documentation reference, Zabbix monitoring of Nimble Streamer with NVidia GPU status.
Setup input stream and it is live , setup transcoding but unable to get the output stream
ReplyDeleteCan you please contact us via helpdesk about this https://wmspanel.com/help ?
Delete