Dante support has been discontinued in Nimble Streamer as of November of 2024.
The information below is irrelevant.
Nimble supports two scenarios of processing Dante audio.
- Receiving Dante audio from local live production environment and using it for further content transformation. The resulting audio can be used for further live streaming via conventional protocols like HLS, MPEG-DASH, SRT. Icecast and any other. You may combine it with any available live video input like NDI and produce full-featured live video output.
- Generating Dante by getting live streams via any available protocol (SRT, RTMP, NDI etc) and providing Dante audio output into your local production environment.
Thus you can process Dante audio and integrate it into your live production environment seamlessly with low cost of ownership.
This article will be updated with latest links and more use cases and related features, stay tuned for updates in our social networks.
Let's see how you can set up Dante and add it into your workflow.
Nimble pre-requisites
At the moment, Dante technology is only available in Nimble Streamer for Windows. The minimum version of Nimble Streamer is 4.0.1-1. Dante is processed by Live Transcoder for Nimble Streamer so you'll need to obtain a respective license. Also, you have to purchase Dante license to make Nimble work with it.
Here are the steps you need to follow in order to start processing Dante with Nimble on your Windows machine.
- Sign up for WMSPanel account.
- Install latest Nimble Streamer on Windows and subscribe for it.
- Install Live Transcoder package on Windows and active its license.
- Set up transcoder scenario to receive or send Dante streams.
- Purchase and activate a respective Dante license.
We assume you will pass steps 1-3 easily within a few minutes using our instruction, so we'll focus on setting up Dante in Nimble Streamer and activating a license.
Receiving Dante
To receive Dante, you need to set up Nimble Live Transcoder to obtain the audio and transform it into other codecs suitable for your use cases.
Click on Transcoder top menu, you'll see transcoder scenarios page.
Click on Create new scenario to see a blank scenario where you can add video and audio inputs, add transformation filters if needed and then set up encoders to produce the output.
To have Nimble receive Dante, drag and drop new audio source and choose Dante in the respective dialog.
Enter Dante name which will be used in your Dante scenarios, such as license activation and routing with other Dante-powered devices.
Then add audio encoder element and link it to your Dante input. Nimble provides various audio codecs, and in order to test the scenario you can choose AAC audio with default settings.
Once you save scenario and it's synced to Nimble instance, you'll be able to connect to audio stream using any supported audio protocol.
To define the protocols you can go to Nimble Streamer top menu / Live streams settings to open the respective page.
Here you may set up either global server setup for output protocols or define specific application setting. In our case we define live application with Icecast, audio-only HLS and SLDP.
You may also re-stream this output via RTMP republishing or SRT publication, please refer to the respective docs for details.
Sending Dante
If you have any live stream input in your Nimble Streamer instance, you can use it as a sourse for Dante output. You may use any protocol like RTMP, SRT, NDI, WebRTC, Icecast or any other from the list of supported technologies.
In our case we have a live stream available, this page can se accessed via Nimble Streamer top menu / Live Streams.
 |
| Active live stream input |
Now we need to set up a transcoder scenario. To generate Dante output. As mentioned in previous case, click on Transcoder top menu, you'll see transcoder scenarios page. Then click on Create new scenario to see a blank scenario.
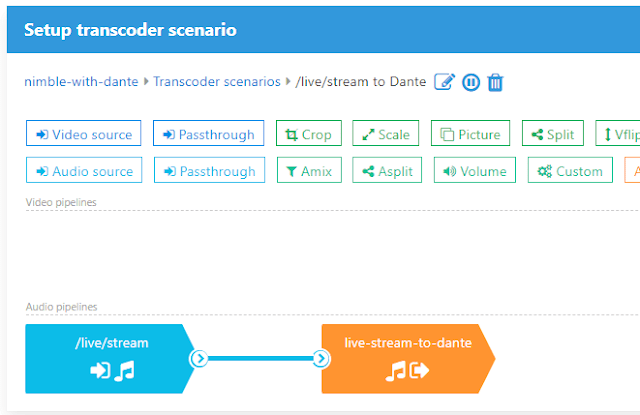
In this new scenario, first add an Audio source to decode your audio source stream. There you need to use the name of your input stream. In our case it's /live/stream/ (see picture below).
 |
| Transcoder scenario for Dante output |
Then you need to drag and drop Audio output. There you choose Dante in the respective dialog.
 |
| Dante output settings |
Activating Dante license and mapping devices
Those of our customers who use Dante, know the licensing procedure very well, so we'll show basic steps and device mapping.
First, the Dante stream at Nimble instance will become visible as a new unlicensed device.
Start Dante Activator to start the license purchase process.
Choose the number of channels you'd like cover and proceed with the purchase.
Now the license is activated and our new device can be used properly.
After that you can route your audio to other devices. In our case we route Nimble's Dante output into a Dante-powered speaker.
You can contact Audinate support team for more information about activating Dante license.
Further steps
Once you have Dante being active and mapped, your device will be able to receive or send data, becoming part of your live streaming production and content delivery infrastructure.
We'll be improving this feature set and will provide with more use cases so you could use Dante with better return of investments.
Let us know of your experience of using Dante.
Related documentation
Nimble Streamer, Live Transcoder, NDI support in Nimble Streamer,


